how to testing translated text when using react-i18next
When you using jest to test react application, you may have doubts about how to test components which are wrapped by react-i18next’s translate function, and how could you verify the translation is applied to your application. Now let’s talk about this topic.
1. testing a translated component
This is easy, according to react-i18next document here, you have several choices, but the best one I think is to do as want you did in your app.js:
const enzymeWrapper = mount(
 <Provider store={store}>
  <I18nextProvider i18n={i18n}>
   <ContactTable />
  </I18nextProvider>
 </Provider>
);
You even do not need a mock config (like react-redux), just do as what you have done in your app.js.
But here you will facing another problem if you use backend mode in your i18n initialize file.
2. verify translated text
You want to know whether i18next has translated your text in testing, so you do what I have told you in previous code. But if you use backend mode in your initialize file, you will find that your texts are not translated, the key in t function will be return.
The reason is when you use backend mode, jest will not request translations files from server side (there is no server side in jest testing), so the resolution is to convert backend mode to sync mode. Create a new initialize file for testing:
import i18n from "i18next";
import enCommonTranslations from "./locales/en/common.json";
import zhCommonTranslations from "./locales/en/common.json";
i18n
    .init({
        lng: "en",
        ns: ["common"],
        defaultNS: "common",
        resources: {
            en: {
                common: enCommonTranslations
            },
            zh: {
                common: zhCommonTranslations
            }
        },
        debug: false,
        interpolation: {
            escapeValue: false
        },
        react: {
            wait: false,
            nsMode: "fallback"
        }
    });
export default i18n;
Use this new file as initialize file in your testing, and you will be excited. All languages are perloaded before unit test, and now you can get translated text from your component.
How to bind scroll/mousewheel between different elements by jquery?
In a case, I want to sync scrollbar action between different element by jquery. For example, when scroll $a’s scrollbar, or mouse wheel scroll down on $a, I want to scroll $b’s scrollbar, or even scrollTop/scrollLeft when $b is overflow:hidden. Now let’s do it:
let syncScrollTopA2B = ($a, $b) => {
  $a.on('scroll', function() {
    $b.scrollTop($a.scrollTop())
  })
}
let syncMousewheelTopA2B = ($a, $b) => {
  $a.on('mousewheel DOMMouseScroll', function(e) {
    let { deltaY } = e.originalEvent
    $a.scrollTop($a.scrollTop() + deltaY)
    $b.scrollTop($a.scrollTop())
  })
}
let syncTop = ($a, $b) => {
  syncScrollTopA2B($a, $b)
  syncMousewheelTopA2B($b, $a)
}
let syncScrollLeftA2B = ($a, $b) => {
  $a.on('scroll', function() {
    $b.scrollLeft($a.scrollLeft())
  })
}
let syncMousewheelLeftA2B = ($a, $b) => {
  $a.on('mousewheel DOMMouseScroll', function(e) {
    if (e.shiftKey) { // press shift key on your keyboard
      let { deltaX } = e.originalEvent
      $a.scrollLeft($a.scrollLeft() + deltaX)
      $b.scrollLeft($a.scrollLeft())
    }
  })
}
let syncLeft = ($a, $b) => {
  syncScrollLeftA2B($a, $b)
  syncMousewheelLeftA2B($b, $a)
}
When pull scrollbar on $a, scrollTop will sync to $b. The same with mouse wheel event. However, horizontal mouse wheel event is different, you should press shift on your keyboard at the same time.
Difference between ‘data’ and ‘state’ in Frontend
After using React for months, I have to say it is very different between ‘data’ and ‘state’. However at the first glance, they are the same thing. Now let’s talk about this topic.
DATA is a stable structured source type. ‘stable’ means it will now change unless you request a new data to cover the variable. ‘structured’ means it is not compatible in different system.
STATE is a fluxible/changeable temporary source type. ‘changeable’ means it can be changed by current code scope. ‘temporary’ means when current scope is destroyed it should be destroyed too.
However, we always make a reference from a state to a data. This make the relationship complex.
I think there are several rules for developers to keep in mind:
- you should not use state to change its refer data, a data which is referred by a state should only be used for response (render, calculation..), no change
- data should be managed in a redux store like manager tool, if you want to request new data, you should dispatch a action to the store and let the store notify the application, and the application subscribe a listener in which can get the new data
- change a state means change the view, visual view is based on state, one state, one view, never make it unexpected when using state.
This is what I thought about data and state.
slickgrid中getItem, getItemById, getItemByIdx和row, id, index
在原始数据中,使用index的概念:
1> 使用getItemByIdx(index)来获取某个数据
2> 通过getIdexById(id)来获取它在原始数据中的index
在当前的视图中(有的情况下和原始数据不同,比如排序、筛选、tree收缩状态下),使用row的概念:
1> 使用getItem(row)来获取某个数据
2> 通过getRowById(id)来获取它在当前视图中的row
使用id就可以干任何事情:
1> 使用getItemById(id)来获取某个数据
2> 通过getRowById(id)来获取它在当前视图中的row
3> 通过getIdexById(id)来获取它在原始数据中的index
比如想通过当前视图中某行数据的row来获取它在原始数据中的index,就必须通过getItem(row)->item.id->getIdxById(id)这样的方法来获取。
-
感谢#837 会飞的小蜗牛 2019-08-25 20:53
flex盒子模型的grow部分子元素宽高不能用百分比
在使用flex盒子模型一段时间之后,发现这货的坑真是不少,其中最最让人难理解的,就是它的flex-grow部分的子元素无法使用100%的对应尺寸。下面来举个例子:
<div style="display: flex; width: 300px; height: 200px;">
  <div style="width: 100px;"></div>
  <div style="flex-grow: 1">
  <div style="width: 100%; height: 100%; overflow: auto;"></div>
  </div>
</div>
上面的代码,我们希望创建一个盒子,盒子左边有一个固定100px宽度的div,右边说一个填满剩余空间的弹性伸缩div。而在这个弹性伸缩的div内部,我们希望放一个塞满整个区域的容器,容器设置了overflow: auto,因此,当这个容器内的内容超出可视区域时,会出现滚动条。
然而,事情没有想像的那么容易,上面的width: 100%并不会按我们想象的方式,使用它的父元素的宽度,而是会使用300px。
这是因为,再css标准里面,width/height如果是百分比的话,必须为它的parent提供一个确定的width/height,当然,parent的width/height也可以从再上一层继承。而如果上面这个条件不成立的话,parent会继续向上冒泡,直到找到一个确定的对应宽高为止。
不幸的是,flex的flex-grow是不确定的,因此,这里的width: 100%不能按我们想象的方式展现。
如何解决这个问题呢?那就是再在flex-grow元素的内部使用flex布局,它自己是弹性伸缩的,而你可以使它的内部元素也是弹性伸缩的:
<div style="display: flex; width: 300px; height: 200px;">
  <div style="width: 100px;"></div>
  <div style="flex-grow: 1; display: flex;">
  <div style="flex-grow: 1; height: 100%; overflow: auto;"></div>
  </div>
</div>
这样修改之后,就可以达到我们的目的。
通过这个问题的分析,基本就掌握了flex里面的精髓。“弹性”代表着没有固定宽度,而想要占满弹性容器,就必须在该容器本身实现一个新的弹性盒子模型。
react异步处理多次渲染的解决方案
react的组件有一个非常烦的操作,就是异步数据渲染。页面第一次打开的时候,会去mount所有的组件,但是,这个时候往往都是没有数据的,特别是通过数据驱动的SPA。大部分的方案都是在componentDidMount中请求数据,得到数据后调用this.setState更新数据。这个方案对于单个组件是没有问题的,但是,当数据来源不同,有一部分来自父组件,有一部分来自自身,就比较麻烦。有这么一个场景,父组件请求完数据之后,调用自己的setState,导致子组件界面重新渲染了,子组件此时请求数据后也setState,导致自己的界面重新渲染,这时没有父组件任何事。但是麻烦的事情接着来了,子组件自己请求数据重新渲染之后,父组件再次请求数据,虽然父组件并没有修改子组件的props,但还是导致子组件重新渲染,这时,子组件上一次请求的数据导致的渲染结果会被清空,整个子组件全部重绘了。实际上,我们希望保持子组件自己更新后的状态,并和父组件传来的props有一个merge的过程。
这种情况的大部分解决方案,是禁止子组件自己请求数据,请求数据由父组件全权代理,通过父组件的setState更新子组件的props,在子组件的componentWillReceiveProps中去更新子组件的state来达到更新子组件的视图的目的。
但是,如果我不打算采用这个方案,那么该怎么办?
还是有办法的,关键在于子组件的componentWillReceiveProps和shouldComponentUpdate。
第一个想法是只通过shouldComponentUpdate进行控制:
shouldComponentUpdate(nextProps, nextState) {
  return !isEqual(nextProps, this.props) || !isEqual(nextState, this.state);
}
isEqual是lodash的方法。这样可以判断,当新的state和新的props有任何一个有变动时,才会更新界面。然而,这需要开发者非常注意:
1.绝对不能直接操作state,举个例子:
let { items } = this.state
items.push(1)
this.setState({ items })
这个操作非常危险,看上去setState的操作是合法的,虽然你修改了state,但是你用新的是值去setState,然而,如果你这样操作,shouldComponentUpdate中的nextState将会是被push了新值的state,判断会错误。正确的做法是:
let { items } = this.state
items = items.concat(1)
this.setState({ items })
一定要用一个copy,而非直接修改state。
2.不能在componentWillReceiveProps中setState,在我的前面一篇文章里面说过,componentWillReceiveProps内部的setState是同步的,会马上更新state而不触发重绘,所以,如果你在componentWillReceiveProps中setState,那么shouldComponentUpdate中的nextState会是经过componentWillReceiveProps修改过的。
第1个问题是可以避免的,在万不得已的情况下,我们甚至可以动用lodash.cloneDeep,但是第2个问题,我们需要谨慎处理,因为我们不可能不在componentWillReceiveProps中调用setState,这时不可能的,我们异步数据处理方案只能这样去做。那么怎么解决这个问题呢?
那就是,在componentWillReceiveProps中做进一步判断,是否要更新setState,大部分情况下,如果父组件虽然重绘,但是传给子组件的props不变的话,这个子组件不需要重绘,所以,在componentWillReceiveProps中也加入一个判断:
componentWillReceiveProps(nextProps) {
  if (isEqual(this.props, nextProps)) {
    return
  }

  // ...

  this.setState({ ... })
}

shouldComponentUpdate(nextProps, nextState) {
  return !isEqual(nextProps, this.props) || !isEqual(nextState, this.state);
}
这样的处理就极为巧妙了。当父组件传给子组件的props发生变化时,子组件整个重置,用新的props重绘(之前的setState造成的改动被重置),而如果父组件传的props不变时,就不进行任何动作。
这个问题,带来了react组件的另外一个思考,如果我们的大部分组件都是依赖异步数据的,那么组件的生命周期是不是存在问题?componentDidMount的意义何在呢?难道仅仅是绑定一些事件之类的?
-
哈喽,看到你这篇文章写得蛮清楚的,我遇到了一个类似的问题,想请教一下~
当我在来回快速切换菜单的时候,每个菜单didmount的时候都分别请求各自的数据,我在上一个请求没有完成时,就手动点了下一个菜单,这时先先展现了菜单B,而后菜单A的响应完成后,又重新渲染了菜单A的view,导致我真正想要看的菜单B的view没有被渲染,请问你对这个问题有了解嘛~
(PS: 446875622 这是我的微信号,方便的话可以加我一下,我仔细请教,麻烦了~)#673 一个装睡的人 2018-12-11 20:16 -
deferer-queue了解一下 https://www.tangshuang.net/6092.html#674 回复给#673 否子戈 2018-12-11 20:28
-
好的,蟹蟹~#675 回复给#674 一个装睡的人 2018-12-11 20:30
why react component bind this in constructor
In many react component’s constructor, developers always bind its methods with this, like:
export default class MyComponent extends Component {
  constructor() {
    this.say = this.say.bind(this)
  }
  ...
}
This sentence seems to be stupid. Is this regulated by react?
No!
In fact, react component class follow ES6 class std. The reason to put this sentence is because when you use this.say in your render, you alway use it as onClick callback function, this is why this is not point to instance of this component. Let’s look into this code:
<a href="" onclick="alert(this.href)">click</a>
You know what this point to here, so when you use a component method as a event callback function, this in the function does not referer to the instance of component. So another way to solve this problem is to bind this when you use the method, like:
export default class MyComponent extends Component {
  constructor() {
    // do not use bind sentence
  }
  render() {
    return <a onClick={this.say.bind(this)}>click</a>
  }
}
Now you can use this in say as want you want.
网上看到这个前景色和背景色配色方案。放在这里备用。
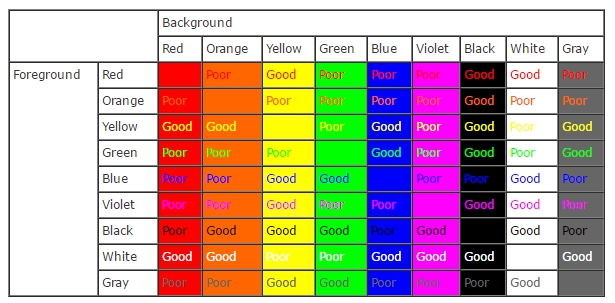
前景与背景配色方案
非得写一行字,有意思么。。。
当我从sublime转到atom时,以为遇到了真爱,但是卡卡的atom简直不忍直视,总感觉这货随时会挂掉,进王者峡谷智能是脆皮坦克一般的存在。当我抱着试一试VS CODE的心态,下载安装了之后,瞬间那种喜悦感,恨不得把自己电脑上最大的数据库文件打开来试试。VS CODE比atom更精美,速度更快,不带有疯狂的package社区,专注写代码。特别是底部打开时候的紫色工具条,太艳了。很快,我就从一个厌恶微软产品的人,转而喜爱上这款微软发布的开源编辑器。在我几乎所有的电脑上卸载掉以前的编辑器,专门用VS CODE编程。
不足之处就是快捷键和sublime不一样,要习惯很久,而且有些很实用的快捷键也不一样,导致经常按错。没办法,要舒服的躺进一个坑,就要痛苦的从前面的坑里爬出来。
run Photoshop CS2 on Windows10
When I downloaded the free old version of Adobe Photoshop CS2 and installed it on windows10, I found it is not able to launch the software, it comes out with a error alert, and force me to close the program. I was aware of it is a compatibility problem, but not know how to fix it. After tried a lot, I found the most easy way: using windows application tools.
- close your photoshop cs2 alert first
- open your photoshop cs2 installed directory, and select Photoshop.exe
- on the top of the screen, there will be a tab named Manage
- click Troubleshoot compatibility item
- follow what it call you to do, try more
- done

And you may need to run photoshop as administrator, for this, right click on Photoshop.exe and open properties, change to Compatibility to select Run this program as an administrator.